All Cycling UK Member Groups (both formal and informal) and affiliate groups have the opportunity to have their own pages on our website. Once the page is set up, the main group contact will receive an email from us and from that point, they can take control of the page and start adding events, rides, posts and other pages to it. To start off with, the default contact for the group (the Secretary is the main contact for Cycling UK Member Groups) is made the group page 'manager'.
If you are the Secretary or default contact for your group, you just need to log onto the main Cycling UK website to activate your role as the manager of your group's page. If you have not yet registered with the site, you will need to do this first.
The first time this happens, you will see a notification at the top of the screen and your group will be added to your user profile.
Who can edit my group's publicity page?
This can be done by either the 'group manager' or 'group administrators'. A group has only one group 'manager' but can have many group 'administrators'.
Who is the group manager?
When we set up a new publicity page for a group, the group manager is our principal contact for the group (typically the group Secretary). However, this can be changed so please contact the membership team if you want to do this or email membership@cyclinguk.org.
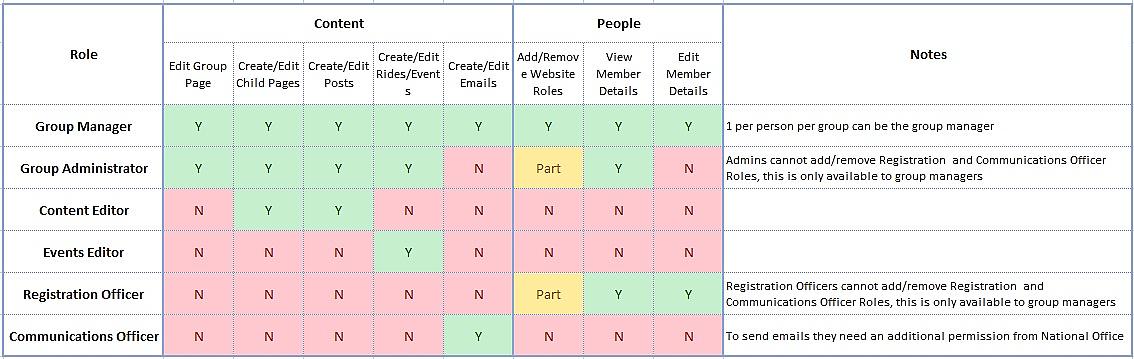
What are the roles and permission I can give other group members to help with the administration of the pages on the Cycling UK website?
There are now six roles for group publicity pages:
- Group Manager: this role is automatically assigned to the main group contact (usually the Secretary).
- There can only be one manager per group (unless extra manager roles are added by staff at National Office on request)
- Managers are the only people who can assign the two new roles of Registration Officer and Communications Officer to group members (Cycling UK Member Groups Only)
- Managers can view and edit members’ local data (as can anyone with the Registration Officer role) (Cycling UK Member Groups Only).
- Group Administrator
- Can edit the main group page, add new content and events and can give other members of the group permission to add content and events.
- For Cycling UK Member Groups only - additional administrators can view current members in their area
- Content Editor
- Can create and edit group child page content and group posts
- Events Editor
- Can create and edit group events and rides
- Registration Officer (Cycling UK Member Groups Only)
- Having this role allows the group member to view a list of current members in the group’s postcode area. Members’ local data can be added and edited.
- Communications Officer (Cycling UK Member Groups Only)
- this role enables the group to create and send emails to all members in their postcode areas or to a selected subset such as new members, lapsed or active members only. Initially, all emails will be approved by National Office.
Below is a table to summaries the roles, any group member can be assigned 1 or more roles and the same role can be given to more tha 1 person.
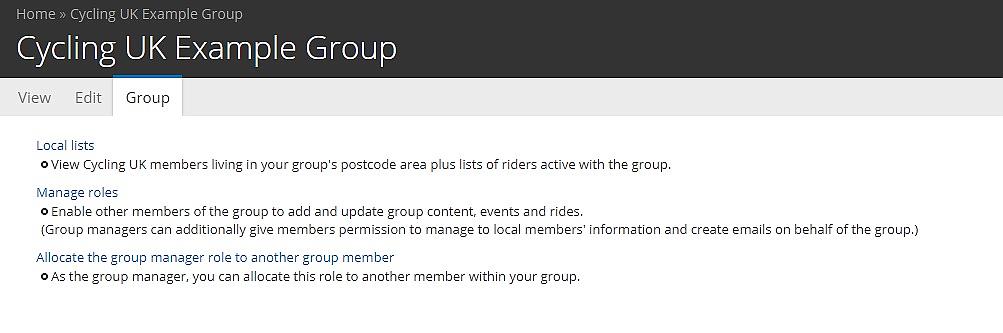
How can I add website roles?
-
These roles can be controlled via the Group tab at the top of the main group page:
-
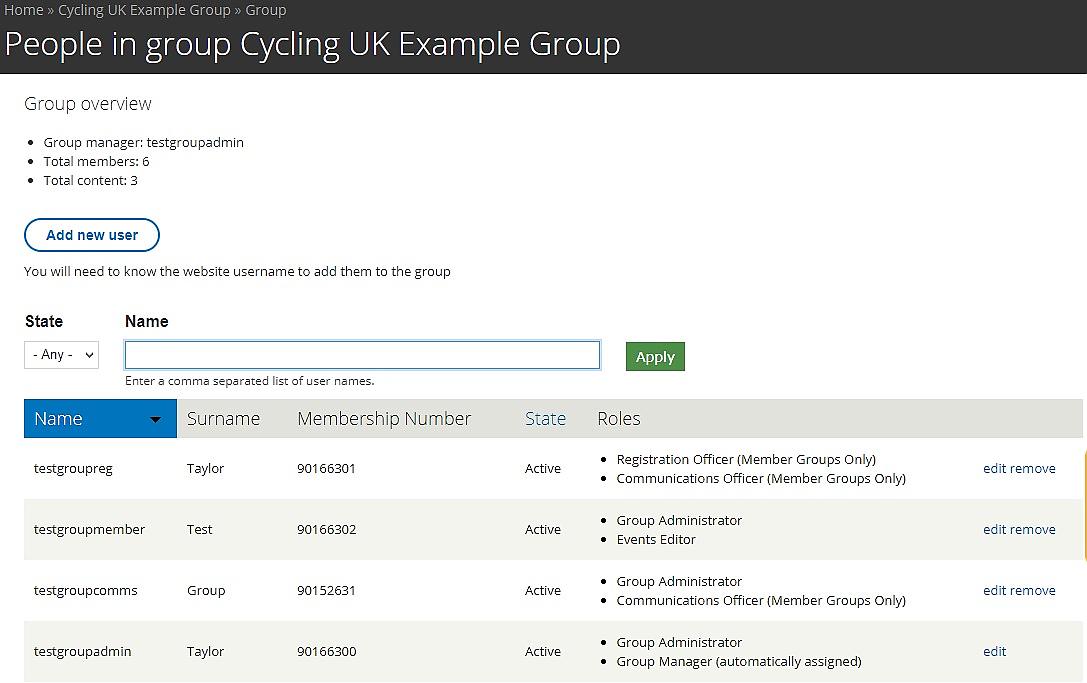
Once on the Group page click on “Manager Roles” to view existing group website admins.
-
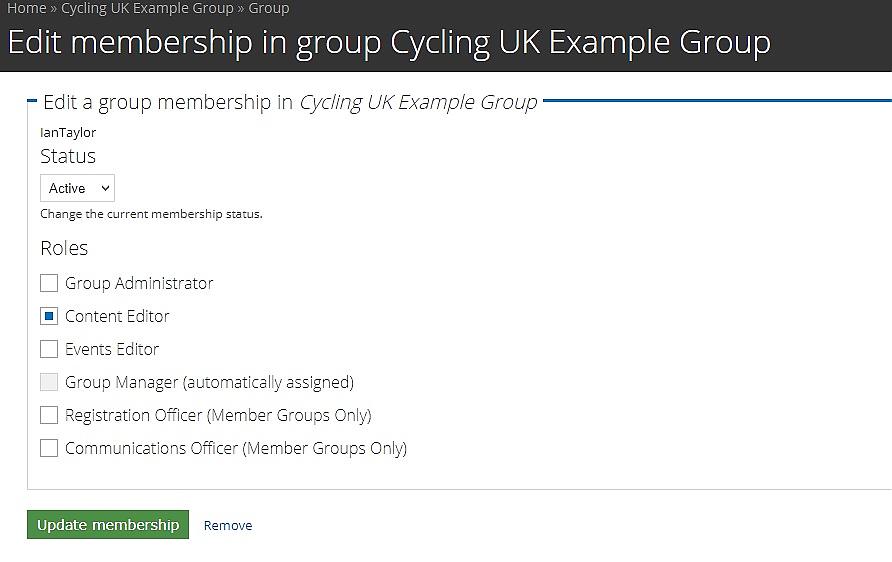
To add or remove the administrator role from one of the existing members, select the edit option next to their username and on the next screen select the administrator member checkbox.
-
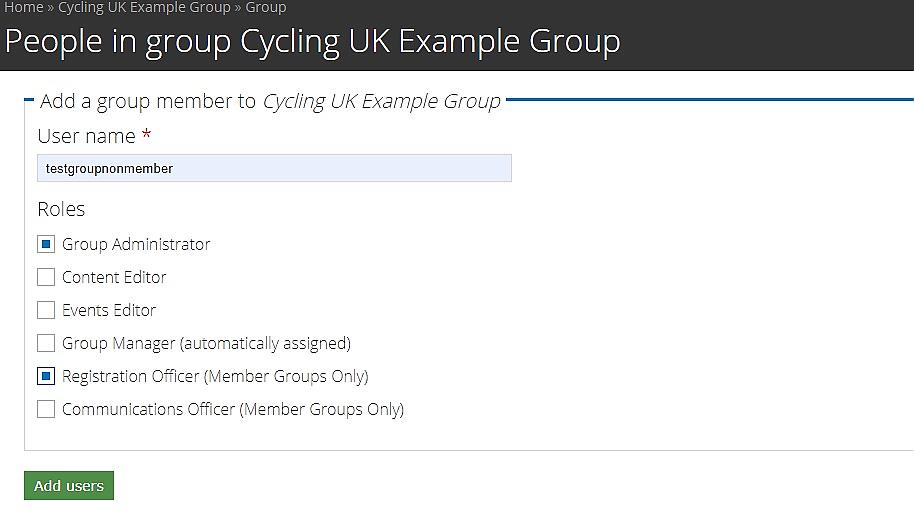
To add a new person select 'Add new user' - the person will need to be already registered with the site and you will need to know their username.
Enter their website username and then assign any appropriate roles
How do I change the group manager?
The group manger (or a staff member at Cycling UK) can pass the role onto another member of the group. The group manager will see an additional option of "Allocate the group manager role to another group member" on the group tab. Click on this and then enter the website username of the person you wish to pass the role onto.
- The group manager or one of the group administrators can update the main group page.
- If you are the group manager, or one of the group administrators, log into the site (if you are not already logged in) and navigate to your main group page via the link within your profile or the groups' listing page: https://www.cyclinguk.org/groups-listing
- Once on the main group page, select 'edit' from the menu above the main image
- The group edit page is in two sections:
- Main group information including title, image, welcome text and the main information about your group text area.
- Title - this is the name of your group
- Image - add a main image for your group.
- If you have yet to upload an image for your group, select the 'Browse' button and the media browser will appear
- In the media browser either upload a new file or reuse any file you had previously uploaded
- Set the alt and title for the image (this helps people using screen readers) and submit the image
- Once selected, the image will show on the edit page and below it you will see three variants of the image, select each and in the pop-up select the area of the image that looks best and press save
- Welcome text - this apears as an overlay over the the image and is best as a short piece of text (if currently this is long, consider moving the text to the 'about the group' section)
- About the group text - this is the main text area, please enter a summary about your group.
- Extra Group Information - this section has a number of tabs to help split up the different types of information:
- Activities and Information - this section is for the type of rides the group puts on.
- Activities of the group - select the type of activities the group does (you can select multiple activities)
- Information about group ride - enter information about the rides available from the group
- Rides download - this can be a traditional rides list in PDF format or GPX routes etc
- Location
- Catchment area of the group - this is the area you would expect people to live in who would be interested in your rides
- Zoom into the area you want to set - this can be done by double clicking on the map, using the zoom controls or entering your location in the geocode box below the map
- Draw the area:
- once in roughly the right area, select the polygon icon at the bottom of the map (or the point icon if you would prefer a single point)
- then click on the map where you want the polygon to start, then move to the next point, continue till you have mapped your group's area, to finish double click.
- if you are unhappy with the area selected, just do it again; once complete, the old area will be removed and the new area will show.
- Contact details
- Enter the main contact name, email address (that is used behind a web form) and public phone number.
- Website address - if your group has its own website, then enter it here in the full format including "http://"
- If you do not wish to use the group page but instead just want to redirect users to your own group page, tick the box below the Alternative website URL box.
- Gallery and Download
- Gallery - add additional gallery images to showcase your group
- Download - any additional download for your group
- (Office Use Only)
First, it's important to know the difference between a Ride and Event. The information below will help you differentiate between the two.
- Ride for regular group rides or socials such as club runs or AGMs. These can be reoccurring ie once month on a Saturday or every Wednesday.
- Event for rides open to both Cycling UK members and the public.
- Note we require events with more than 200 riders to be registered with us for insurance purposes by completion of an event registration form.
The following fields are the minimum that we require you to complete for an Event or Ride:
- Event Type - select ride or event or one of the other options (ie Bike Week Event)
- Name, for example, "Romsey Round 75 miles"
- Date and time, for example, "02/02/2014" and "09:00"
- Type, for example, a "road ride" or "AGM"
- Location - see below for more detailed information
There is help text below each field on the event creation and edit pages
NOTE 1 - The Event/Ride content type only allows the creation of single events and rides, if you are running an event that has a number of rides you can create one ride and then once set up clone the page (using the option at the top of the page), changing the fields as required.
NOTE 2 - there is now only a single "Event/Ride" option. We are in the process of moving over Multisession events to the new content type and we will be in touch with groups that currently use the multisession events content type.
1) Go to your group homepage e.g. Southampton & Romsey CTC- you can find all groups on the Local Groups homepage.
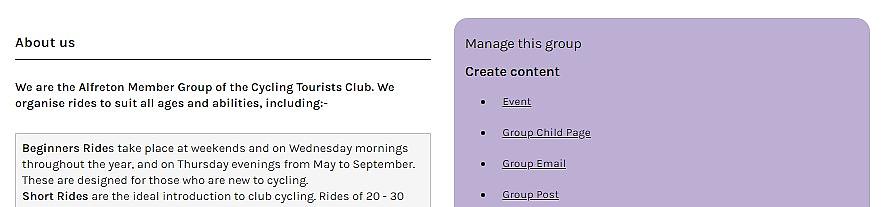
2) There are two types of additional groups pages you can add, 1) child pages for static information like sub group details, and 2) posts for time specific content like news and rides reports.
3) Select the option, appropriate option from the "create content" sidebar menu.
The 'Group Child Page' or 'Group Post' in the sidebar menu
3) On the following page complete the following form fields in order to create the new page:
- Title - the title of the page (this will show at the top of the page).
- Image - upload the main image for your page
- Teaser - summary for the page
- Body - this is the content that you wish to display on the new page.
- Additional Options - in this section you can add addition text that will show in the right hand bar, add a gallery and upload attachments.
4) Click 'Save' to create the page.
5) The new page will now appear in a new menu in the right-hand column called 'Group Information' and 'Latest'.
The new page in the Content Menu Members who have been assigned the Communications Officer role for the website have the ability the create and send group emails. Emails can be sent to all members in the group’s postcode area or to subsets such as new members, members who have recently lapsed, members flagged as active and so on.
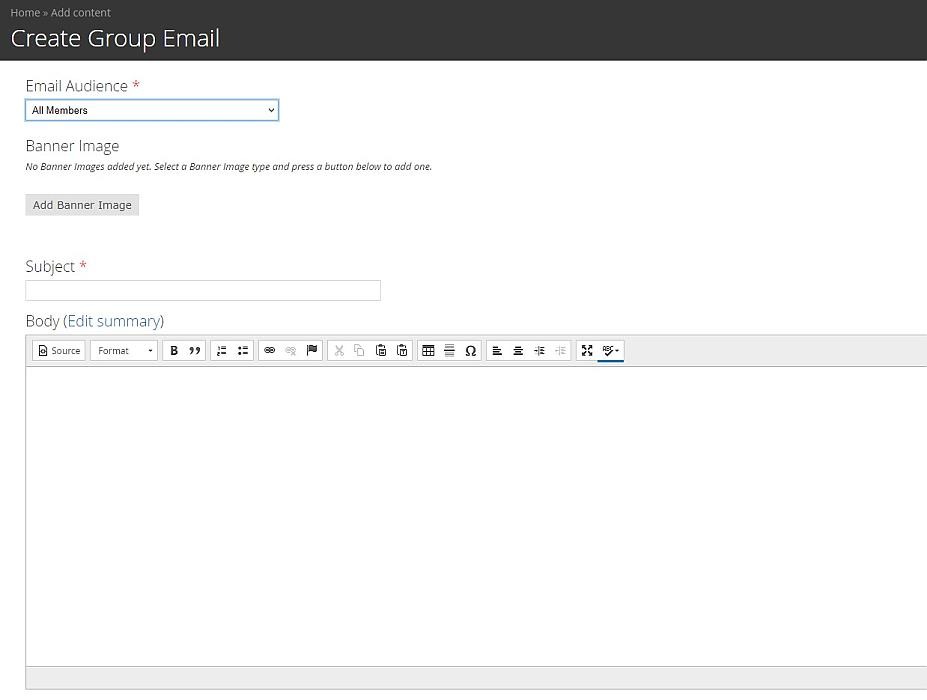
To create a new email click on the Group Email link within the purple Manage this group box on the right hand column of the group homepage.
Fill in the form. The options are:
- Group Audience – this is who the email will be sent to
- Banner Image – this is an image that will show at the top of the email (once an image is uploaded click on the image preview to see what area of the image will be visible in the banner. The same rule also applies to images added to stories)
- Subject – this is the email subject line
- Content – there are 3 content sections (one or more can be used)
- Body and Footer are where you can add text, links and formatting; the body field will show below the banner image (if used) and the automatic salutation (so you don’t need to say “Dear Member” etc).
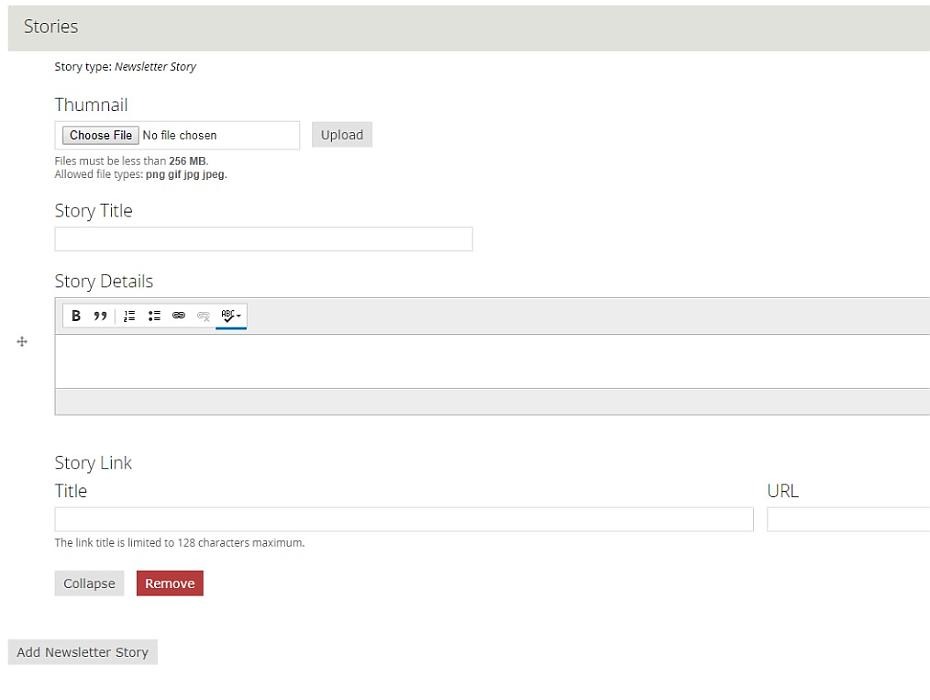
- Stories – you can add one or more stories. Each story has a title, image, text and optional link.
- Reply To Email Address – emails will be sent from noreply@cyclinguk.org; this is NOT the email address to be used if you want the email recipent to be able to send a reply – you can add a different email address here if you wish.
When complete, press save: this will create the email in Draft format for you to first review on screen. Once you have reviewed it on screen, click edit at the top of the email, making any changes you require on the orginal fields. Additionally, now you will see two extra options at the bottom of the page:
- Status – the options here are:
- Draft – will not show on the site or be sent
- Draft – Send Test Email (to myself) – this will save the email and send you a test email (to the email address associated with the account you are logged in as)
- Ready To Send – this shows the email is ready to send to members, if the user has the additional Email Approval permission (currently set by Cycling UK National Office Staff); it will send the email straight way, but if not, it will need approval by someone with that permission or somebody at National Office. (It is envisaged that at least one person per group will have this additional permission after the initial test period.)
- Sent – this is set by the website after the email has been sent
- Show on Group Home Page – if “show” is selected then the email will show in the latest newsfeed once the email has been sent (useful for newsletters which you may want everyone to see).
You may review on screen again by selecting Draft; once you are happy with what it looks like on screen select “Draft – Send Test Email (to myself)”, and you should then receive the test email. At this point, it is good to check links are correct and the images show OK.
Once you are happy with the email, select "Ready To Send” - the email will then be sent if you have the additional Email Approval Permission (set up by staff at National Office).
If you do not have this permission, then someone at National Office will review the email and send it on your behalf. They will also be in touch with you so you can be given the extra permission once you are confident with the system.
If you want to view an email previously set up (or any other content you have created in the past), go to your user profile and select the "My Content" tab .
How to create a good newsletter or email to your members
Once you’ve mastered the basics of how to put a newsletter together, here are some top tips for making it look good and, more importantly, read by your audience:
- Add a nice photo at the top – this will bring your newsletter to life and show people who you are and what you are about more easily and quickly than words. Make sure you have consent from anybody who is identifiable to use their image and make sure the photo is in focus and ideally shows a range of different riders.
- You can also add a photo or logo in the body of the text to break it up.
- There’s no need to add a ‘Dear’ or ‘Hello’ salutation line – the system will put this in for you.
- Use hyperlinks to point people to websites, email addresses and so on – it looks a lot neater and you’ll be less likely to be spammed – to create a hyperlink, highlight the word you want to be hyperlinked eg Cycling UK then right click on it, click on ‘insert link’ and copy the hyperlink address or email address into the box marked ‘Text to display:’ as required:
- Do not write ‘click here’ – this can make your newsletter seem like spam and is not really necessary nowadays – just hyperlink as above to anything you want to direct people to.
- Check your spelling and punctuation carefully – if this isn’t your strong point, ask someone else to read through the newsletter first. Put commas in where you would naturally take a breath when reading out loud!
- Don’t send really long, wordy emails – you can add attachments such as a newsletter to your document quite easily but better still, hyperlink to where there is more information on your webpage
- Check you have attached the correct attachment though!
- Add a clear subject line so that readers will want to open your email – this is really important if they are not to be deleted as spam! Make sure the subject line says who and what the email is about.
- Give a friendly sign-off, preferably with somebody’s name so it’s more personal. No need to say ‘Safe Cycling’ or similar – we believe statistically cycling IS safe!
- Once you have a good format for your newsletter, you can copy it and just tweak it next time you want to send one out so it’s a fairly easy process.
Here is an example of a nice newsletter sent out recently by one of our Member Groups to all members in the area; it was sent out with the subject line Burnley and Pendle CTC - Club News.
We particularly love:
- the short paragraphs with clear headings,
- the colourful, carefully composed photos of the happy, smiling riders
- the wealth of news and information contained in it
- and the hyperlinks in Read more…. which take you to more information
So have a go at creating your own newsletter and see how easy it is.
When we are happy that your newsletters are looking good, we can give you email approval permission as Communications Officer so you can create and send your own emails as and when you want.
Currently, only Group Managers, Registration Officers and Group Administrators have the rights to view group members’ data. This may be changed to just group Registration Officers on feedback from testing. Once you have contacted us to say that you would like to be able to view your registered volunteers online, we will upload the list of members in your postcode area to your publicity page - this process may take up to half a day so please bear with us. These lists are then updated every second Monday to take account of any new or lapsed members in your area.
To view current members, go to the group’s publicity page and click on the Groups tab:
In the Groups tab, select the top option of “Local Lists”
Here you can view the current members, with search options of member number, surname, email and active flag.
If the user has the Registration Officer role or is the Group Manager, they will be able to access the edit records view; this is the same as the view above but there is also the option to update more than one member at a time to show if they are active in the group.
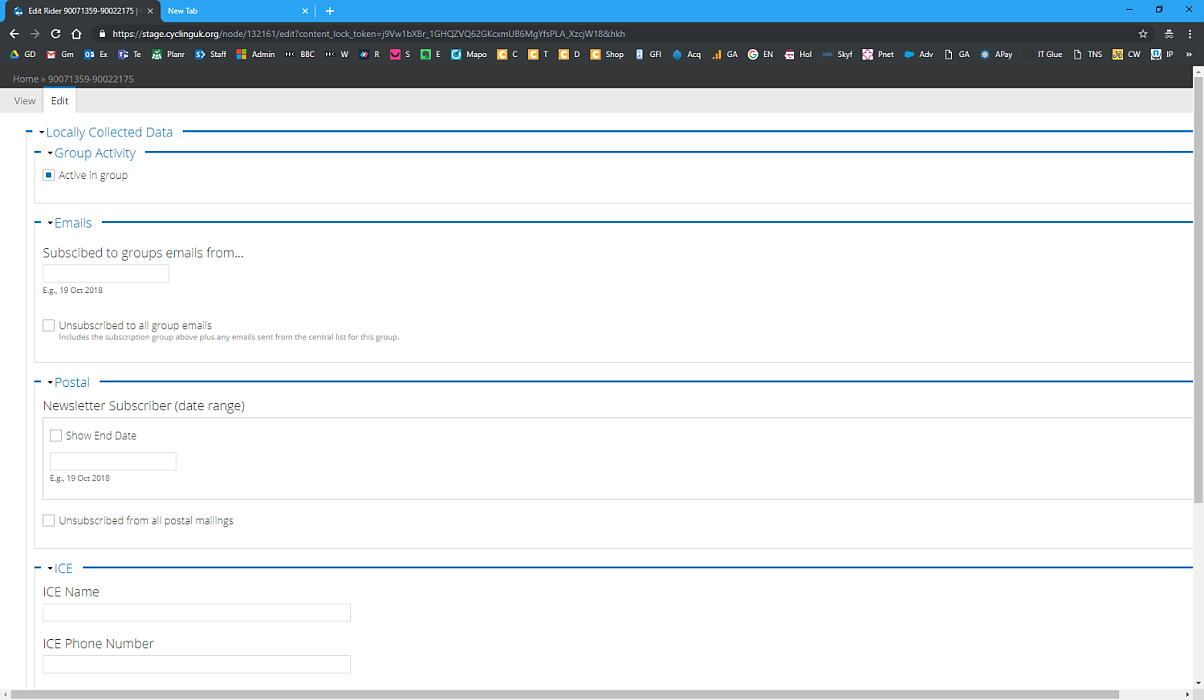
From either of these lists, if you click on the membership number field, you will see further details of the member:
The personal data is split into two sections:
- Central Data – updated weekly (frequency to be decided) by Cycling UK National Office.
Members can update their own details either via their user profiles on the website or via the Membership Team. Details visible to groups include:
- name
- membership number
- membership details for example: type of membership, voting rights, join and renew dates
- status (new, lapsed etc)
- email address (this is filtered centrally for suppressions),
- greeting
This data can be used for sending emails and, in the future, will include a postal address so you will be able to send communications by post.
- Local Data – the group manager and the person/people with the Registration Officer role for the group’s publicity page on the Cycling UK website has the ability to update members’ details with additional data relevant to the group.
- a flag to show if a member is active within the group
- local email and postal newsletter subscriptions
- email and postal suppressions.
These options will be further developed in the coming months in conjunction with Cycling UK’s Member Groups. (see the "Member Groups Toolkit Roadmap" section below)
Phase 1 (now live)
Restricted access to Members’ Data via Cycling UK’s website
This data will be refreshed weekly and will show current Cycling UK members, recently lapsed members (with a two-month grace period) and those that have been marked as active with a particular group.
Groups can update this data with the following details:
- whether or not the rider is an active rider with the group;
- whether or not they are a newsletter subscriber;
- whether or not the member has unsubscribed from the groups email or postal mailings
Communications by Email
- an email template
- the ability to send welcome emails or emails to all members
- options for welcome emails and follow up emails to new members
- the ability to unsubscribe members and email link to unsubscribe mailbox managed by Cycling UK
- there is now added a "Group Content" list in the "Groups" tab so you can go back to previously sent emails or historic events and rides
Communications by Email
- complete and improve the email audience options
- turn on the disabled options (email to active and subscribed members)
- flags for committee member and rider leader for email audience
Phase 2 (No date currently set) (To be developed in conjunction with two volunteer member groups)
The following data functions should be available. The ability to:
- add additional riders who are not current members of Cycling UK
- create subgroups/informal groups and link riders to them
- for welcome emails give the option to automatically send every month
- the ability for members to opt in and out of communications via a webform/my account rather than email
- manage "In Case of Emergency" contact details (name and mobile number) and riders’ own mobile numbers
- basic anonymised reporting about group members
Communications by Post
- flag for postal subscriptions and magazine subscriber (with end date), new members without emails
- downloadable list of names and addresses via CSV file
- log of data downloaded and by whom for GDPR purposes
- download member data agreement
Lower priority
- manage and assign roles to specific people eg ride leader, event organiser etc and sync with Care
- save additional data - save documents against a member’s record; photo consent; parental consent
- reporting for groups on open/click through rates
- record participation in a particular ride or event