We’ve probably all seen those dreary films, usually on social media platforms, of cycling videos taken in one continuous camera shot. The ride was probably great fun, the viewing, however, is not.
It takes quite a talent to pull off a single-shot cinematic triumph like Sokurov’s Russian Ark. That’s not to say you can’t make a great short film of your adventures.
Many of us today, through smartphones and action cameras like GoPro, have the means to record great video. The plethora of free-to-download editing software means we also have ready access to the tools to make an engaging short film of our cycling experiences.
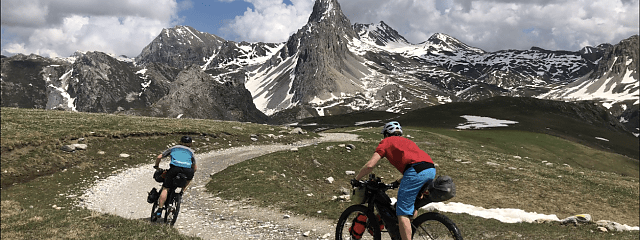
It’s not enough just to go out and shoot footage of your trip, though, you need a plan. Below are all the thoughts and steps that I apply to making films, such as this great little circuit taking in Somerset’s Cheddar Gorge.
Once you’ve mastered these skills, if you’d like to enter our competition to win a great prize bundle from komoot, then all you need to do is share your work with us on social media.
Know your camera
It is essential before shooting anything to understand your camera settings and limitations.
You’ll have to make decisions about what quality of footage you want, what ‘field of view’ is best for your scenario and make an assessment of how long your battery will last, as well as how much space there is on your camera’s SD card.
All of these factors interplay. Make sure you understand how to achieve the best results before you set off on your ride. It would be frustrating if halfway through your trip you realise the battery or card storage space will run out – so don’t be afraid to experiment.
Modern action cameras often allow you to tether via your phone. This is a very helpful feature during the shoot because it allows you to easily switch off or start and stop recording during your trip, as well as helping you to compose your shots.
Set this up ahead of your trip, rather than on the go. If you can attach your phone to your handlebars it will make monitoring and controlling the camera much easier on the ride.
In the film I used a GoPro Hero 7 recording at 4K with 25fps (frames per second) with a medium wide field of view, and auto-exposure on.
How to get good audio
Remember that any film is made up of good audio as well as good visuals. This is often where action cameras are less well equipped.
Depending on the weather, you will probably have to remove the camera from any waterproof casings since this will block audio. If you can figure out where the microphone inlet is, you should also be able to prevent wind from entering the microphone and distorting the sound quality.
Plan plan plan!
You know your camera and its audio abilities, now you need to plan your film.
Spend some time writing out a route introduction, explaining the features and highlights as well as a conclusion with which to end your video.
You might be surprised how awkward it is to speak to a camera, particularly if you are starting in a public place. Speaking ad lib is difficult, while knowing what you want to say will help you appear confident.
It doesn’t need to be complicated; the film I made simply starts with: “This tour starts from … goes past … and finishes…”
Wait for that weather window
Unless you’re aiming for a gritty bad weather film, check the weather is going to be acceptably nice!
You want to give some thought to what time of day would best suit your route. You might want to consider where the sun will be casting a shadow and whether that will affect parts of your route. There are websites that can help you make this assessment.
During the shoot
Start your tour shoot from a public place (not outside your house). Set your route recording app going and compose your first shot while introducing your route.
I opted to film my bike rather than myself. Good audio should be your priority at this point. Put the camera close to your mouth so that your voice will be the dominant audio source.
If you’re recording on a windy day shield the camera’s microphone from the wind by cupping your hand over the microphone.
Experiment with camera mounting. I’ve found the best position is on top of my head. It’s the most stable place and will suffer the least mechanical shake.
It’s tempting to mount the camera to the handlebars or forks of the bike (and this can lead to some interesting angles) but your footage will definitely suffer from road buzz as you roll over the not-so-smooth UK roads and trails.
If there are key features of your route, be sure to stop and point them out to the camera.
Again, remember to get good audio. It might be easier to record your voice describing the feature and then shoot a shot of the feature. These can be combined later during the edit stage.
Point out any beauty spots or obvious landmarks. If you know a bit of local history that can be summarised briefly be sure to include it. Or if you have personal recollections of the route share these as well (“this is my favourite part of the route because …”).
During the route you can also take a photo of yourself and your bike to be used as a thumbnail image once the video is finished. This is your chance to visually sell your tour to any potential viewers, so try to make it a beautiful image.
If there are nice landmarks along the route, spend some time trying to get a good shot of them. Don’t underestimate human curiosity.
Some of the most successful landscape photographs include a human figure within the image. I’d recommend setting your camera (or your phone) on a stable surface (a fence post, bench or wall, for example) putting it on self-timer, then compose your shot and fire the shutter, giving yourself time to enter the frame with your bike.
You can use apps like Snapseed to play around with these images once you’ve finished the ride.
After the shoot
This is where you can start getting creative.
If you don’t have video editing software (iMovie or similar) consider installing Davinci Resolve. It provides free professional-grade video editing and colour grading.
I’d caveat this by saying you’ll need very powerful hardware in order to operate this programme and if you’re not familiar with video-editing software there will be a steep learning curve. However, YouTube is your friend and filled with tutorials on whatever editing software you’re using if you get stuck.
If you want to include a Google Earth image of your tour, like I did, you can download free software like Google Earth and plot your route on there.
I found it quite difficult to control camera angles and so opted for Google Earth Studio. You’ll have to sign up and wait for your account to be approved by Google (it took a day for me to get approval but there is no guarantee of that).
This is where having a record of your route is handy, as you can use your route file to create a short 3D film of your route. When using Google Earth Studio, I found I had to convert the usual GPX files into KLM files in order to input the ride data.
There are websites that will convert these files for you (although again you’ll have to sign up to use them); I used outdooractive. I’d also highly recommend watching tutorials on how to create quick tours such as this one made by Boone Loves Video.
I used the ‘Quick Starts’ animation guides in order to produce the Google Earth imagery seen at the start of the tour. Not all of the UK has been rendered in 3D yet, so you may find that this cool feature is lacking in the region you’ve ridden your tour in.
You can download free music to go with your tour from YouTube studio – you’ll need a Google account to access this though. Play around with the different tunes until you find one which you feel suits your film.
Conclusion
Well that’s it. There are quite a few different skill-sets you’ll need in order to complete this kind of project.
But if you’re reading this during lockdown, now is the time to learn new fun skills.
I really enjoyed putting my project together and I hope you do to. Best of luck!