Not all bikepacking setups are created equal, and as anyone who’s tried their standard touring or bikepacking bag configuration on a more rugged mountain biking tour will attest, the tougher demands of off-road riding often require a different approach.
Many a mountain biker will argue that dropper posts have been one of the most fantastic inventions of recent decades, helping to position the saddle out of the way and allow the rider to move about the bike more effectively on more technical and downhill trails.
However, this novel tech can also cause problems when it comes to loading up with saddle bags – especially when teamed with the rear wheel travel of full-suspension mountain bikes, so a change of tact is often necessary.
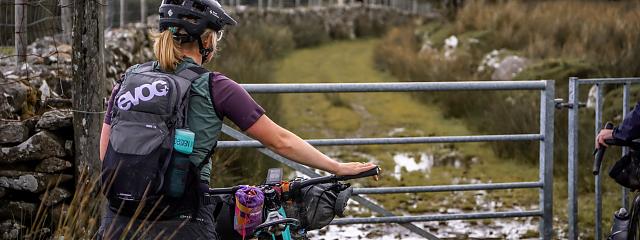
Switch a saddlebag for a rucksack
The easiest way to adapt your bikepacking setup for mountain biking is to switch out a saddle bag for a rucksack. This means that you can use a dropper post unhindered, and there’s no chance of experiencing a rear tyre buzz on a saddlebag, which can be exacerbated on full-suspension bikes as the distance between the saddle and tyre decreases as the suspension compresses.
On the negative side, using a rucksack can be less comfortable, carrying weight on your back rather than on the bike, and certainly sweatier in hot weather than riding without one. Therefore, it’s key to keep your rucksack as light as possible, and make sure that you use a well-fitting pack. Storing heavy kit on your back will also take the centre of gravity further from the bottom bracket, which is less favourable for technical riding.
Brands such as Deuter and Osprey offer unisex and women’s fit rucksacks. The women’s fit packs often feature shorter backs and a different shape around the shoulders and chest to accommodate different body shapes. While you’ll get by with hiking-style rucksacks, MTB-specific models will be tailored specifically for the riding position, and more comfortable for multi-day riding.
Dropper-friendly saddle packs
While they are less common, there are a few dropper post-friendly bikepacking bags out there. Tailfin’s Aeropack uses a bag that sits on top of a carbon rack, securing to the rear axle and to the seatpost with articulated pivot points below the dropper stanchion.
Other saddle packs follow a more conventional design, though with adaptations for dropper posts. For example, the Ortlieb Seat-Pack QR uses a seat-lock attachment that goes around the dropper stanchion and allows you to use all but 40mm of the dropper’s travel.
Apidura offers a dropper post adapter, which is fixed onto the dropper stanchion, allowing you to use your existing Apidura Backcountry seatpost bags with a dropper post.
No dropper post?
If you’re running a standard seatpost then you can largely ignore this advice, as you’ll most likely be able to use a standard seatpost bag. However, shorter riders may still struggle with space over the back wheel, so an off-road-specific pannier setup may be best here.
Be warned, standard panniers may not be suitable as they’re not designed to cope with the rigours of rough off-road riding and can easily bounce off!
Pack your handlebar bag wisely
While a flat bar often makes fitting a handlebar bag easier than with drop bars, there are some downsides. Typically, mountain bike brakes are not designed with bikepacking bags in mind, so make sure you take care not to cause any severe kinks in your brake hoses that could lead to damage.
Some handlebar bag suppliers offer foam spacing blocks which can help position your handlebar bag well and avoid complications.
Ensure that there’s sufficient space between your handlebar bag and your front wheel, and that you don’t get any ‘tyre buzz’ when the suspension comes into play if you’ve got a suspension fork. For shorter riders, consider a smaller volume bag or a bag support to ensure you don’t damage your handlebar bag.
Carrying water
Depending on your mountain bike and bag setup, you may need to rethink hydration. Do you have space for multiple bottles, or is a hydration bladder in a rucksack or frame bag a better idea? Can you attach water bottles to the fork legs using clever devices such as Tailfin’s Suspension Fork Mounts?
Adjust your suspension settings
Don’t forget that you’ll need to adjust your suspension settings to compensate for the added weight of bikepacking bags. This will mean adding air pressure to your fork and/or shock, as your total weight (rider plus clothing, shoes and helmet plus bags and kit) will be higher.
Depending on what suspension you’re running, check with the manufacturer for recommendations based on your total weight to avoid damaging your equipment and get the best ride feel.
A shakedown ride with all your kit comes highly recommended here to check it all works well and you’re not experiencing any bag rub.
Protect your frame
Finally, don’t forget to protect your frame before adding bikepacking bags. Not only will this save your paint from damage, but it can also prevent more serious issues that can arise after hours of bag rub, especially where mucky conditions and grit are involved.
Choose from dedicated kits such as Invisiframe, RideWrap, HKT, Dyedbro and Restrap’s Bicycle Protection Kit, or go for a more simple approach with 3M Helitape.
Key areas to protect include the head tube where a handlebar bag may rub, as well as areas of the top tube, down tube and seat tube where frame bags attach.
Ready to go?
Rigged up and ready to hit the trail? Check out more about our mountain bike-friendly bikepacking routes, the Great North Trail and Traws Eryri.